Introduction
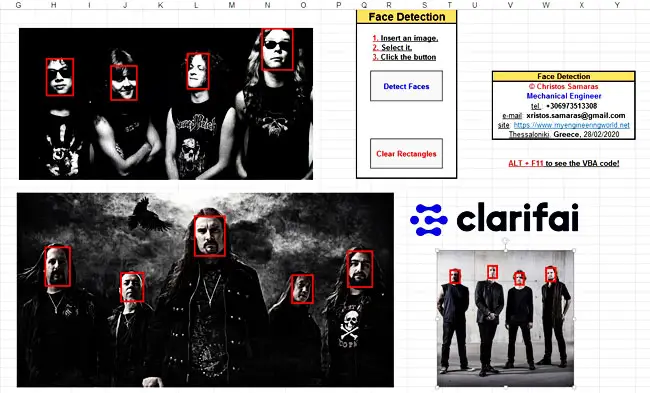
Is it possible to detect faces from an image in Excel? I guess that your immediate reaction will be a big NO! Well, think twice, since now it seems that we can! The purpose of this article is to demonstrate what can be done if we combine a powerful Artificial Intelligence API with a C# (console) application and some (advanced) VBA code.
In the previous post, we learned how to create a C# console application using the free Visual Studio 2019 Community Edition and call that C# application from VBA. The C# code provided in that post was quite trivial since the emphasis was on the “caller” VBA code. Here we will see a much better example, which demonstrates how a higher-level language, like C#, can be used to communicate with an Artificial Intelligence API.
The entire face detection concept can be divided into three main parts:
- The Web API, where we will see how to get a free key for the Face Detection API.
- The C# code, where we call the Face Detection API and process the JSON results in a meaningful way.
- The VBA code, where we export the image to a temporary location (through a temporary chart), we call the C# application and use its results to draw rectangles around the faces of people included in the image.
It looks difficult, isn’t it? Well, it’s not that hard as it seems at first. However, I should warn you that I will not provide any details on how the actual face detection is done. The emphasis will be given to the connection of the individual components. So, are you ready to dive into some exciting details?
Face Detection API and how to get a (free) API key
The first building block is the API that does the actual hard work. Here we will use the Face Detection API that Clarifai provides. According to their site, “the Face Detection model returns probability scores on the likelihood that the image contains human faces and coordinate locations of where those faces appear with a bounding box. This model is great for anyone building an app that monitors or detects human activity”.
If you wonder how good that model in identifying faces is, I can ensure you that it does a pretty good job. I have run several successful tests. As long as the face is visible in the image, the model detects it accurately, even in small images. You can see some sample results on their site and the sample images section below.
To get a (free) API key from Clarifai, please follow the next steps. If you need more information about the Clarifai pricing policy, you can check their site.
Step 1: First of all, go to their site and click on the Sign-up button on the page’s top right corner.

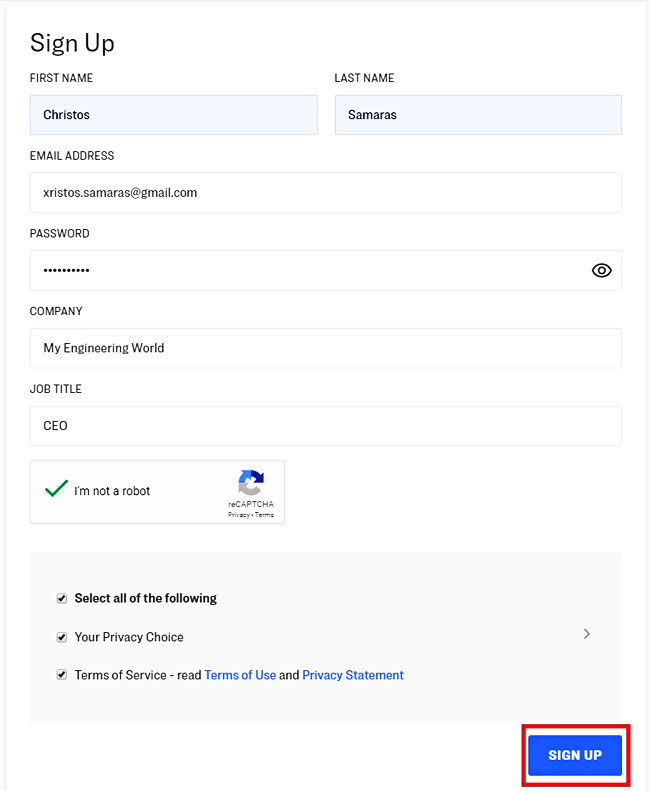
Step 2: Fill in the necessary information in the next form and click the Sign-up button.
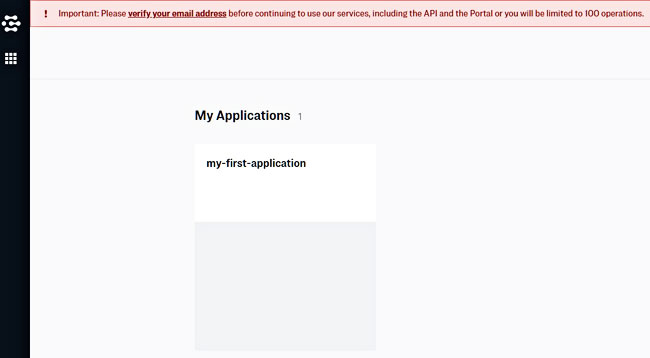
Step 3: In the next screen, you will get some welcome messages, but it is important before proceeding to anything else to verify your email, as the red toolbar on the top of the screen warns you.
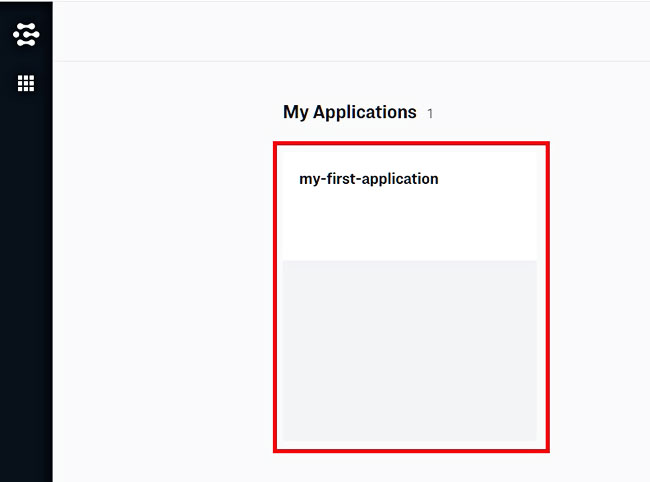
Step 4: When you verify your email, the red toolbox will disappear. Then, click on the “my-first-application” box that is automatically created after your sign-up.
Step 5: In the “my-first-application” screen, go to the section API keys. There, a key will be already created. Just click on the “Copy Key to Clipboard” button to copy the key.
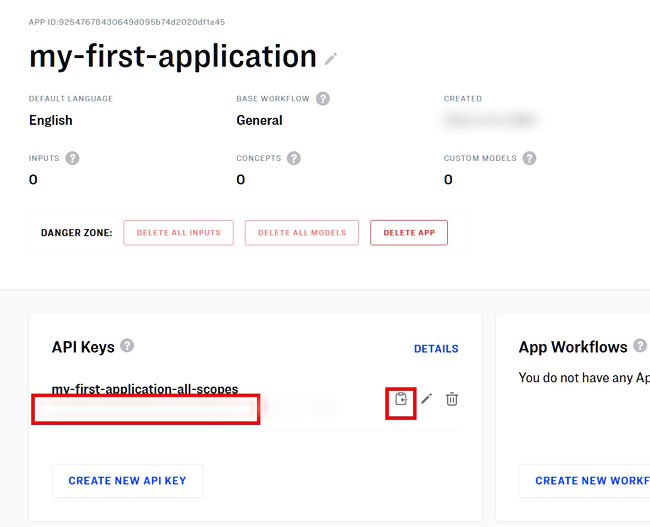
Step 6: Finally, to utilize the key, open the sample workbook that you will find in the Downloads section below and paste the key in the ClarifaiApiKey constant. Be careful with the quotation marks surrounding the key value!

C# code
We got the free API key from the Clarifai page. Now it’s time to perform the Clarifai server’s request and read the response, i.e., the coordinates of the image’s faces. Please follow the previous post’s steps to create a new C# console application in the Visual Studio 2019 Community Edition.
The additional steps required for this C# application are given below. Note that the images are from an older version of Visual Studio that I use (2015 Enterprise). The steps, however, will be identical:
Step 1: In the new application, from the menu, select Project → Manage NuGet Packages.
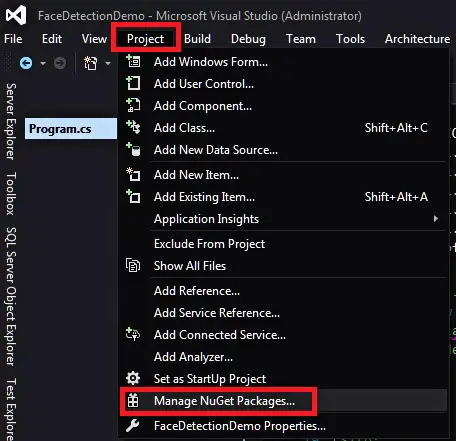
Step 2: In the NuGet window that opens, search install the following two packages:
- Clarifai (current version 1.3.2).
- Newtonsoft.Json (current version 12.0.3)
After installing these two packages, you should see something like the following image:
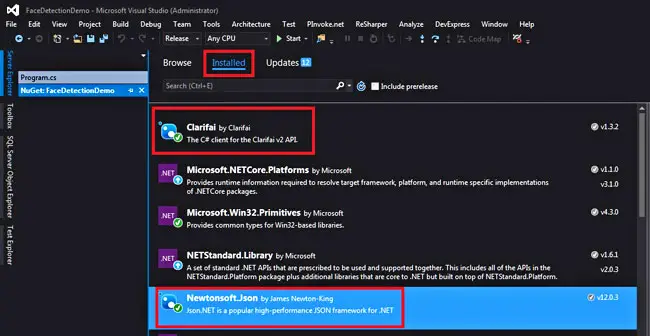
If you wonder what these packages do, the quick answer is that they make our lives easier! The long answer is that the Clarifai package eases the communication with the Clarifai server, while the Newtonsoft.Json package helps to de-serialize the JSON response from the Clarifai server. Note that when you perform the above steps, there might be newer versions for these packages.
After installing these 2 packages, paste the following code into the Program.cs:
using System;
using System.IO;
using Clarifai.API;
using Clarifai.API.Responses;
using Clarifai.DTOs.Inputs;
using Clarifai.DTOs.Models.Outputs;
using Clarifai.DTOs.Predictions;
using Newtonsoft.Json;

/*
------------------------------------------------------------------------------
The code below can be used to detect the faces from a given image.
It uses the Clarifai API for the face detection and outputs the coordinates
of the faces detected in the image (top left corner and bottom right corner).

Written By:    Christos Samaras
Date:          28/02/2020
E-mail:        [email protected]
Site:          https://myengineeringworld.net
------------------------------------------------------------------------------
*/

namespace FaceDetectionDemo
{
	class Program
	{
		static void Main(string[] args)
		{
			// Check the number of the arguments (it should be 2).
			// The first is the API key and the second is the image path.
			if (args.Length != 2)
			{
				Console.WriteLine("ERROR: Invalid input parameters!");
				return;
			}

			// Check if the image exists (second argument).
			if (!File.Exists(args[1]))
			{
				Console.WriteLine("ERROR: The image does not exist!");
				return;
			}

			// Create the Clarifai client using the API key (first argument).
			ClarifaiClient client = new ClarifaiClient(args[0]);

			// Configure the request by sending the input image in the Clarifai server.
			ClarifaiResponse<ClarifaiOutput> response =
				client.PublicModels.FaceDetectionModel
				.Predict(new ClarifaiFileImage(File.ReadAllBytes(args[1])))
				.ExecuteAsync()
				.Result;

			// Check the response.
			if (response.IsSuccessful)
			{
				try
				{
					// De-serialize the response into a JSON object.
					dynamic json = JsonConvert.DeserializeObject(response.RawBody);

					// Get the regions (e.g. each region corresponds to a box containing the face).
					dynamic boundingBoxes = json["outputs"][0]["data"]["regions"];

					// Loop through all the regions and go deeper to get the bounding box from each region.
					foreach (dynamic boundingBox in boundingBoxes)
					{
						// Top-left corner.
						double topLeftCornerX = (double)boundingBox["region_info"]["bounding_box"]["left_col"];
						double topLeftCornerY = (double)boundingBox["region_info"]["bounding_box"]["top_row"];

						// Bottom-right corner.
						double bottomRightCornerX = (double)boundingBox["region_info"]["bounding_box"]["right_col"];
						double bottomRightCornerY = (double)boundingBox["region_info"]["bounding_box"]["bottom_row"];

						// Write the corners.
						Console.WriteLine($"{topLeftCornerX} {topLeftCornerY} {bottomRightCornerX} {bottomRightCornerY}");
					}
				}
				catch (Exception)
				{
					// A parsing error occurred.
					Console.WriteLine("ERROR: Parsing error!");
				}
			}
			else
			{
				// A request/response error occurred (invalid API key or other).
				Console.WriteLine("ERROR: Request/response error");
			}
		}
	}
}
The code takes two inputs, the API key and the full path of the image file we want to analyze. Both inputs are sent from VBA (we will see that in the next part). After performing some initial checks, it creates the Clarifai client object using the API key provided. Then, it sends the image to the Clarifai server and checks its response. If the response is successful, the code de-serializes the response into a JSON object, reads the necessary information, and writes it into the console.
The final step in this section is to build the solution following the previous post’s steps.
VBA code
The final part of this tutorial is the VBA section. Here we use the ExecuteAndCapture function we learned in the previous post. However, apart from that function, the VBA code does some quite interesting things. First of all, there is no “easy” way to export an embedded image from the spreadsheet to an external file. For this reason, a temporary chart is created, which mimics the size of the image. Then, the image is copied in the chart area of the chart, and, finally, the chart is exported as an image to a predetermined location.
The VBA code then calls the C# application using the API key and the temporary image path and waits to receive its output. Based on the returned values, either stops (case of error) or draws the rectangles around the people’s faces included in the image embedded on the spreadsheet. The latter requires some simple mathematics since the C# application returns the coordinates of the top-left and bottom-right corner of the rectangles, and we have to adjust them based on the image location.
Finally, the VBA code deletes the temporary image and informs the user about the number of faces detected in the image. Apart from the DetectFacesInImage macro, which performs the face detection, the ClearRectanglesFromImage macro cleans up the rectangle from the selected image.
Option Explicit

'Here you set the (free) API key from Clarifai.
Const ClarifaiApiKey As String = ""

Sub DetectFacesInPicture()

    '-------------------------------------------------------------------------------------------
    'This macro does the following:
    '
    '1. Based on a selected image, it creates a temporary image file relative to the workbook.
    '   To create that image, it uses a temporary chart.
    '
    '2. Using the ExecuteAndCapture function, it calls an external C# console application.
    '   The C# application sends the temporary image on the Clarifai server (request).
    '   Then, it reads the JSON response from the server, i.e. the faces detected in the image.

    '3. The macro then reads the output of the C# application and creates red rectangles
    '   around the faces detected in the image (using the coordinates from the C# application).

    '4. Finally, the macro deletes the temporary chart and the temporary image and informs the
    '   user about the number of the faces detected.

    'NOTE: Ensure that you entered a valid Clarifai API key in the ClarifaiApiKey constant.
    '      Otherwise, the macro will NOT work.

    'Written By:    Christos Samaras
    'Date:          28/02/2020
    'Last Updated:  16/01/2021
    'E-mail:        [email protected]
    'Site:          https://myengineeringworld.net
    '-------------------------------------------------------------------------------------------

    'Declaring the necessary variables
    Dim sht                 As Worksheet
    Dim img                 As Variant
    Dim appPath             As String
    Dim chartName           As String
    Dim imagePath           As String
    Dim cmd                 As String
    Dim results             As String
    Dim facesArray          As Variant
    Dim coordinatesArray    As Variant
    Dim i                   As Integer
    Dim cnt                 As Integer
    Dim topLeftCornerX      As Double
    Dim topLeftCornerY      As Double
    Dim bottomRightCornerX  As Double
    Dim bottomRightCornerY  As Double

    'First, ensure that the Clarifai API key is set (e.g. it is not empty).
    If ClarifaiApiKey = vbNullString Then
        MsgBox "The Clarifai API key is empty!", vbExclamation, "Invalid API key"
        Exit Sub
    End If

    'Set the worksheet that will contain the images.
    On Error Resume Next
    Set sht = ThisWorkbook.Sheets("Images")
    If Err.Number <> 0 Then
        MsgBox "The given worksheet does not exist!", vbExclamation, "Invalid Sheet Name"
        Exit Sub
    End If
    Err.Clear

    'Check that there is an image selected.
    If TypeName(Application.Selection) <> "Picture" Then
        MsgBox "You must select an image to proceed!", vbExclamation, "Image Not Selected"
        Exit Sub
    End If

    'Assign the image to the img variable.
    'NOTE: if the img variable was not of type Variant, but of type Shape, this wouldn't work.
    Set img = sht.Shapes(Application.Selection.Name)

    'Create the path of the image that will be created (relative to the workbook).
    imagePath = ThisWorkbook.Path & "\" & "TestFaceImage.jpg"

    'Set the C# application path (relative to the workbook).
    appPath = ThisWorkbook.Path & "\C# Face Detection\" & "FaceDetectionDemo.exe"

    'Check that the C# app exist.
    If FileExists(appPath) = False Then
        MsgBox "The C# app " & vbNewLine & appPath & vbNewLine & "doesn't exist!", vbExclamation, "C# Path Error"
        Exit Sub
    End If

    'Disable screen flickering.
    Application.ScreenUpdating = False

    'Create a new (empty) chart sheet.
    ThisWorkbook.Charts.Add

    'Move the chart to a new location (in the worksheet).
    ActiveChart.Location xlLocationAsObject, sht.Name

    'Ensure that the chart has no border.
    Selection.Border.LineStyle = 0

    'Get the chart name
    chartName = Application.Substitute(ActiveChart.Name, "Images ", "")

    'Alternative method.
    'chartName = Selection.Name & " " & Split(ActiveChart.Name, " ")(2)

    With sht

        'Set the chart size equal to the image size.
        With .Shapes(chartName)
            .Width = img.Width
            .Height = img.Height
        End With

        'Copy the image.
        .Shapes(img.Name).Copy

        'Paste the image to the chart area.
        With ActiveChart
            .ChartArea.Select
            .Paste
        End With

        'Export the chart as a jpg image to the predefined location.
        .ChartObjects(1).Chart.Export Filename:=imagePath, FilterName:="jpg"

        'Delete the chart from the worksheet.
        .Shapes(chartName).Delete

    End With

    'Create the command that will call the executable based on the inputs provided.
    'The parameters are the API key and the path of the image that was exported from Excel.
    'Note the space between the parameters (" ").
    cmd = Chr(34) & appPath & Chr(34) & " " & ClarifaiApiKey & " " & Chr(34) & imagePath & Chr(34)

    'Execute and read the (hidden console) results.
    results = ExecuteAndCapture(cmd)

    'Check if there is any error in the results.
    If InStr(1, Trim(results), "ERROR", vbTextCompare) > 0 Then

        'Error detected! Report and exit.
        MsgBox Trim(results), vbExclamation, "C# Application Error"
        Exit Sub

    End If

    'Split the results into a string array because there might be more than one face in the image.
    facesArray = Split(results, vbNewLine)

    'Count the faces that will be detected.
    cnt = 0

    'Loop through each line of the string array.
    For i = LBound(facesArray) To UBound(facesArray)

        'If the line is not empty, continue.
        If facesArray(i) <> vbNullString Then

            'Split the line into the corresponding coordinates (based on the C# output).
            coordinatesArray = Split(facesArray(i), " ")

            'The C# output returns 4 values, which are the coordinates of the 2 corners containing the face.
            'Top-left corner.
            topLeftCornerX = CDbl(coordinatesArray(0))
            topLeftCornerY = CDbl(coordinatesArray(1))

            'Bottom-right corner.
            bottomRightCornerX = CDbl(coordinatesArray(2))
            bottomRightCornerY = CDbl(coordinatesArray(3))

            'Add a rectangle shape in the image based on the given corners.
            With sht.Shapes.AddShape(msoShapeRectangle, _
                    img.Left + (img.Width * topLeftCornerX), _
                    img.Top + (img.Height * topLeftCornerY), _
                    img.Width * (bottomRightCornerX - topLeftCornerX), _
                    img.Height * (bottomRightCornerY - topLeftCornerY))

                'Format the rectangle (red, thick line) in order to be visible.
                .Fill.Visible = msoFalse
                With .Line
                    .ForeColor.RGB = RGB(255, 0, 0)
                    .Transparency = 0
                    .Weight = 2.5
                End With

            End With

            'Count the faces that were detected.
            cnt = cnt + 1

        End If

    Next i

    'Delete the temporary image that was created.
    If FileExists(imagePath) = True Then
        Kill imagePath
    End If

    'Re-select the image.
    img.Select

    'Re-enable the screen.
    Application.ScreenUpdating = True

    'Inform the user about the number of faces detected.
    If cnt = 0 Then
        MsgBox "No face was detected in the selected image!", vbExclamation, "Fail"
    ElseIf cnt = 1 Then
        MsgBox "A face was detected in the selected image!", vbInformation, "Success"
    Else
        MsgBox cnt & " faces were detected in the selected image!", vbInformation, "Success"
    End If

End Sub

Sub ClearRectanglesFromImage()

    '-----------------------------------------------------------------
    'This macro deletes the rectangle shapes from the selected image.
    '-----------------------------------------------------------------

    'Declaring the necessary variables
    Dim sht     As Worksheet
    Dim img     As Variant
    Dim i       As Integer
    Dim cnt     As Integer

    'Set the worksheet that will contain the images.
    On Error Resume Next
    Set sht = ThisWorkbook.Sheets("Images")
    If Err.Number <> 0 Then
        MsgBox "The given worksheet does not exist!", vbExclamation, "Invalid Sheet Name"
        Exit Sub
    End If
    Err.Clear

    'Check that there is an image selected.
    If TypeName(Application.Selection) <> "Picture" Then
        MsgBox "You must select an image to proceed!", vbExclamation, "Image Not Selected"
        Exit Sub
    End If

    'Assign the image to the img variable.
    Set img = sht.Shapes(Application.Selection.Name)

    'Count the rectangles that will be deleted.
    cnt = 0

    'Loop through all the shapes in the worksheet.
    'Note: there will always be at least one shape (the selected image).
    For i = sht.Shapes.Count To 1 Step -1

        'Check if the shape is actually an auto shape and a rectangle.
        'If there is no check for the auto shape property, then the selected image will be also deleted.
        If sht.Shapes(i).Type = msoAutoShape And sht.Shapes(i).AutoShapeType = msoShapeRectangle Then

            'Ensure that the rectangle is contained in the image.
            'The top-left corner and the bottom-right corner is within the image boundaries.
            If sht.Shapes(i).Top >= img.Top And _
                sht.Shapes(i).Left >= img.Left And _
                sht.Shapes(i).Top + sht.Shapes(i).Height <= img.Top + img.Height And _
                sht.Shapes(i).Left + sht.Shapes(i).Width <= img.Left + img.Width Then

                'Count the rectangle.
                cnt = cnt + 1

                'Delete the rectangle.
                sht.Shapes(i).Delete

            End If

        End If

    Next i

    'Inform the user about the number of rectangles deleted.
    If cnt = 0 Then
        MsgBox "No rectangle was deleted in the selected image!", vbExclamation, "Fail"
    ElseIf cnt = 1 Then
        MsgBox "A rectangle was deleted in the selected image!", vbInformation, "Success"
    Else
        MsgBox cnt & " rectangles were deleted in the selected image!", vbInformation, "Success"
    End If

End Sub
Sample images
The 3 images that follow show how accurate the face detection can be, considering the different resolutions, sizes, and environments of each image used as input.
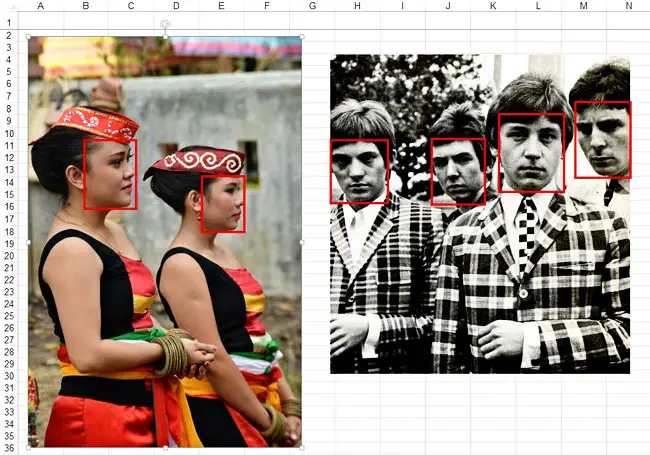
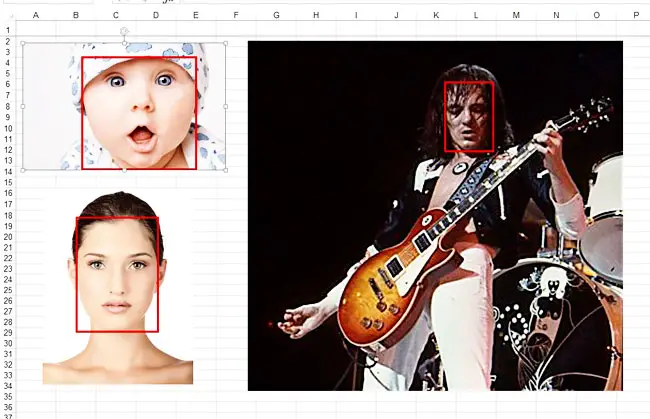
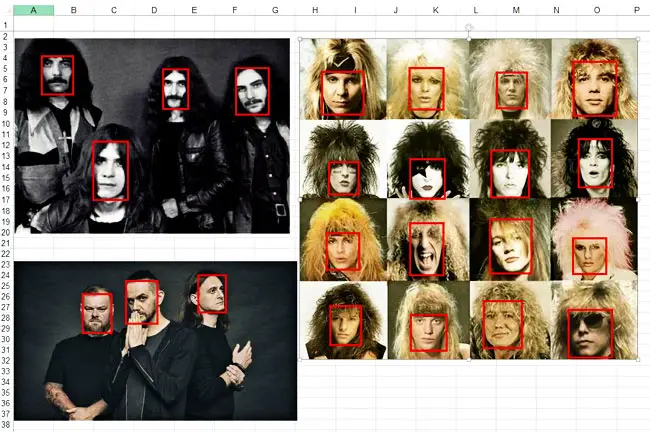
If you need more results, download the sample workbook and the C# application, get a free API key from Clarifai and test your images.
Face detection demonstration video
In the video that follows, I am trying to analyze the different sections of this tutorial.
Downloads
The zip file contains an executable based on the above C# code and a sample workbook containing the VBA code for drawing rectangles around the faces of people included in the images embedded in the worksheets of the sample file. The workbook can be opened with Excel 2007 or newer. Please enable macros before using it.
Final thoughts
In this article, we learned how to use a powerful Artificial Intelligence API directly from Excel. I know that it was not an easy tutorial, but I think it showed several key concepts. Somebody might argue that the C# application is not needed in this example since the API request/response could be processed through VBA. That is a fair argument, and we have already seen examples of calling an external API from VBA (e.g., Google APIs)! However, I suggest checking the C# code. Look how easy and straightforward it is! Only with a few lines of code, all the complexity of the API communication is gone!
Last but not least, considering Microsoft’s intention to move Office scripting from VBA to JavaScript language, don’t be surprised if interactions with Artificial Intelligence APIs and other powerful Web APIs become more popular soon. I think that these cases show the “real power” of JavaScript (or TypeScript), not the typical Office actions.
Read also
Call A C# Console App From VBA
Page last updated: 16/01/2021

